Leaking pipes are a headache, but something even worse than that is pipe leaks that lurk in the dark and go undetected — a hidden plumbing leak.
A leaky pipe installed in inaccessible places, like under the floor or behind walls, is difficult to spot. You’ll need a sharp eye and a good presence of mind to identify a plumbing leak.
Ignoring a leaky pipe can lead to serious damage to your home. Not only does it rot wooden structures, but it also causes a noticeable spike in your water bill.
So, leaky pipes must be repaired immediately, or you will get damaged walls. However, if you are a newbie homeowner and don’t know much about plumbing, you’ve landed at the right place to discover more about your hidden leak.
In our informational guide, we’ll offer quick and easy tips to spot hidden water leaks and tell you about some ways to fix them. Let’s get started, shall we?
Signs Of A Hidden Leak In Your Bathroom
Prevention of a hidden leak is better than cure. Even if everything seems fine, habitually check the ceiling in the room directly beneath another landing and all your basins and cabinets to spot the signs of damage. Water can be coming from a pipe directly underneath the floor.
Spotting these leaks early can save you a bundle on repairs. Let’s dive into some typical signs of hidden leaks.
1. Low Water Pressure
Observe the water pressure of your faucet. Issues sometimes cause low pressure on the main supply, but that is short. If you are facing difficulty with the water pressure, and water is drizzling instead of coming out in full flow, then it is likely that there’s a water supply line leak.
If the water pressure drops because water is sneaking off somewhere else before reaching your tap, it’s a clear sign something’s not right with your plumbing.
2. An Unreasonable Increase In Your Water Bill
Everyone develops a rough estimation of their monthly water bill over time. It is generally higher during hot weather and lower during winter. If you are mindful of your water usage but still observe a sharp increase in the figures, it’s a sign of leakage.
At first, a bit of trickling water might not seem like a big deal, but those drips add up quickly, leading to sky-high water bills. Plus, the damage might be bigger than you think, wasting a lot more water than you’d expect.
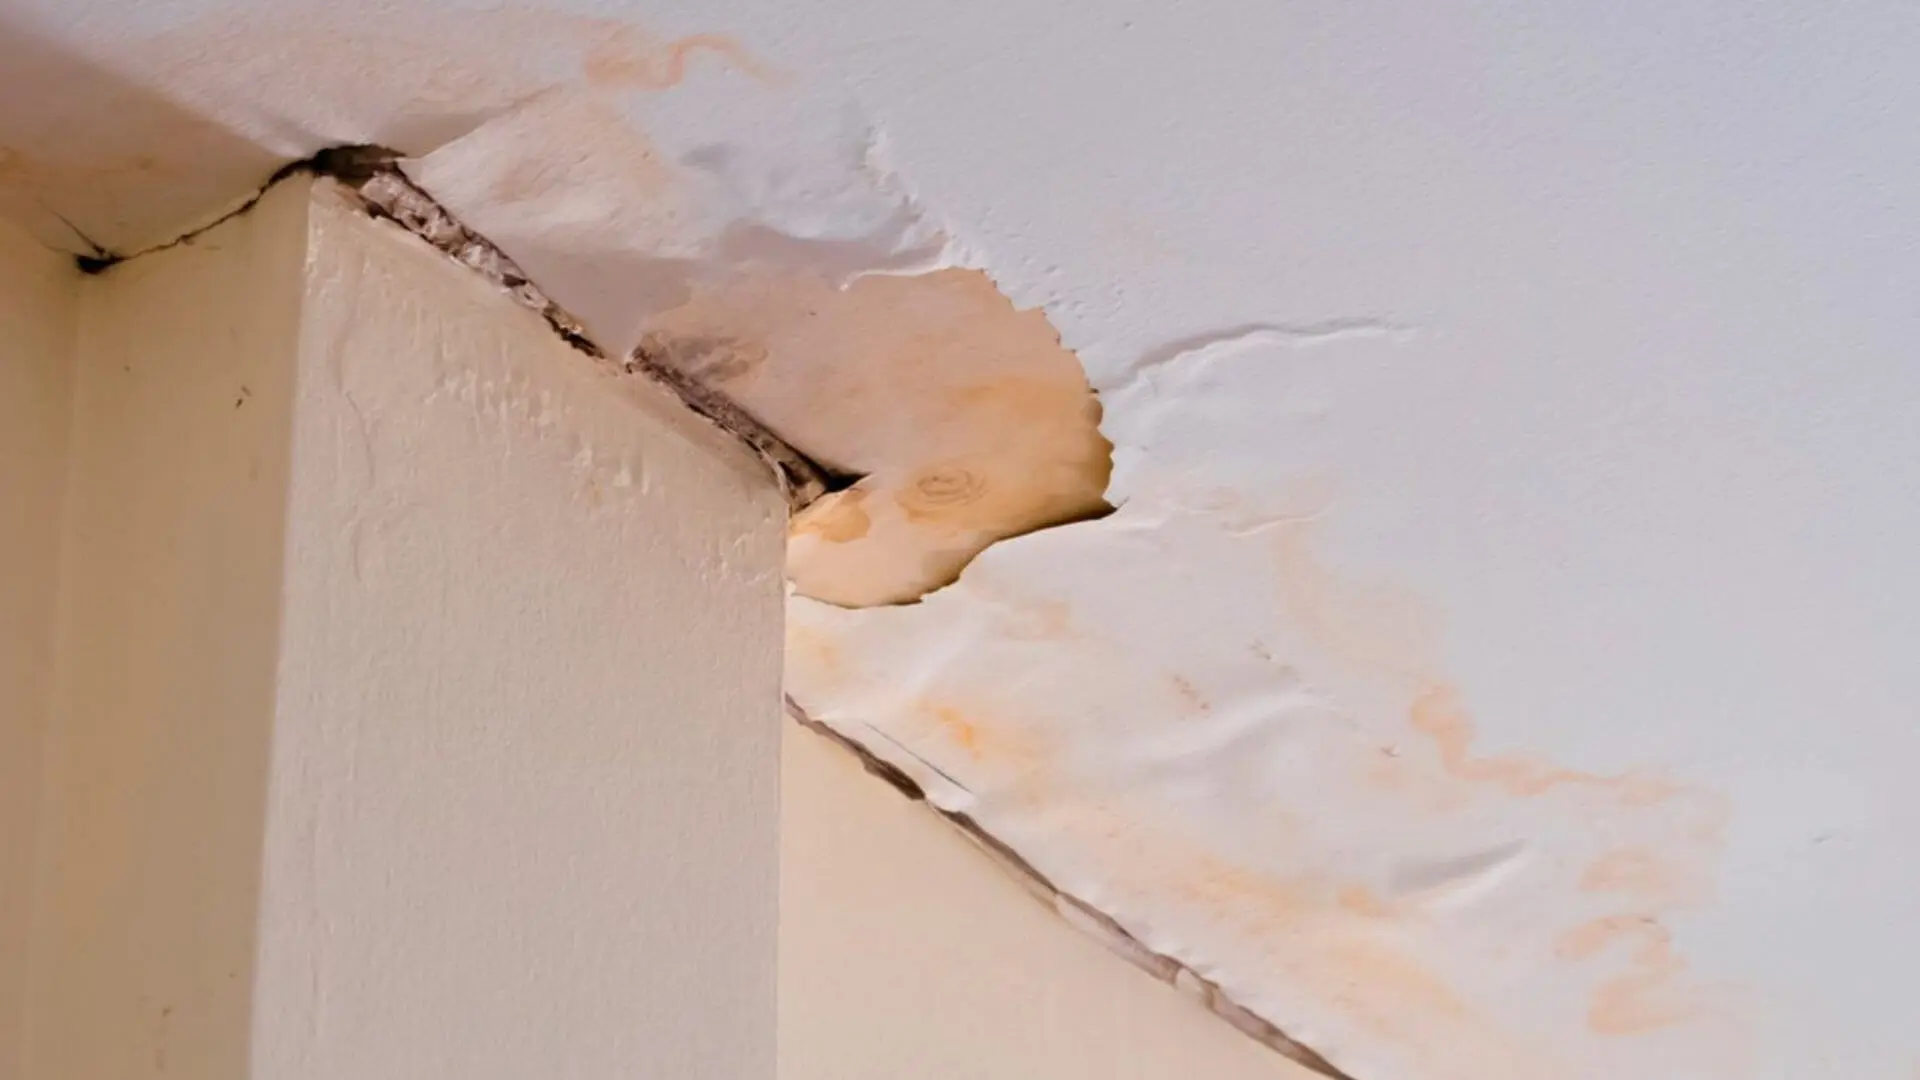
3. Damaged Walls And Warped Floor
Persistent water leakage damages the house, so look out for unusual water spots, chipping plaster, water stains, warped walls, damaged paint, blistering paint, or paint flakes in the bathroom. Also, pay special attention to the corners and ceilings, as they might warp or sag due to a leakage in the overhead pipes.
Be sure to check the bathroom floor regularly. Warped flooring is an obvious sign of underlying leakage, but it can be difficult to notice if the floor is wet. We suggest planting your foot firmly and pressing the tile; if it sags, call a professional plumber.
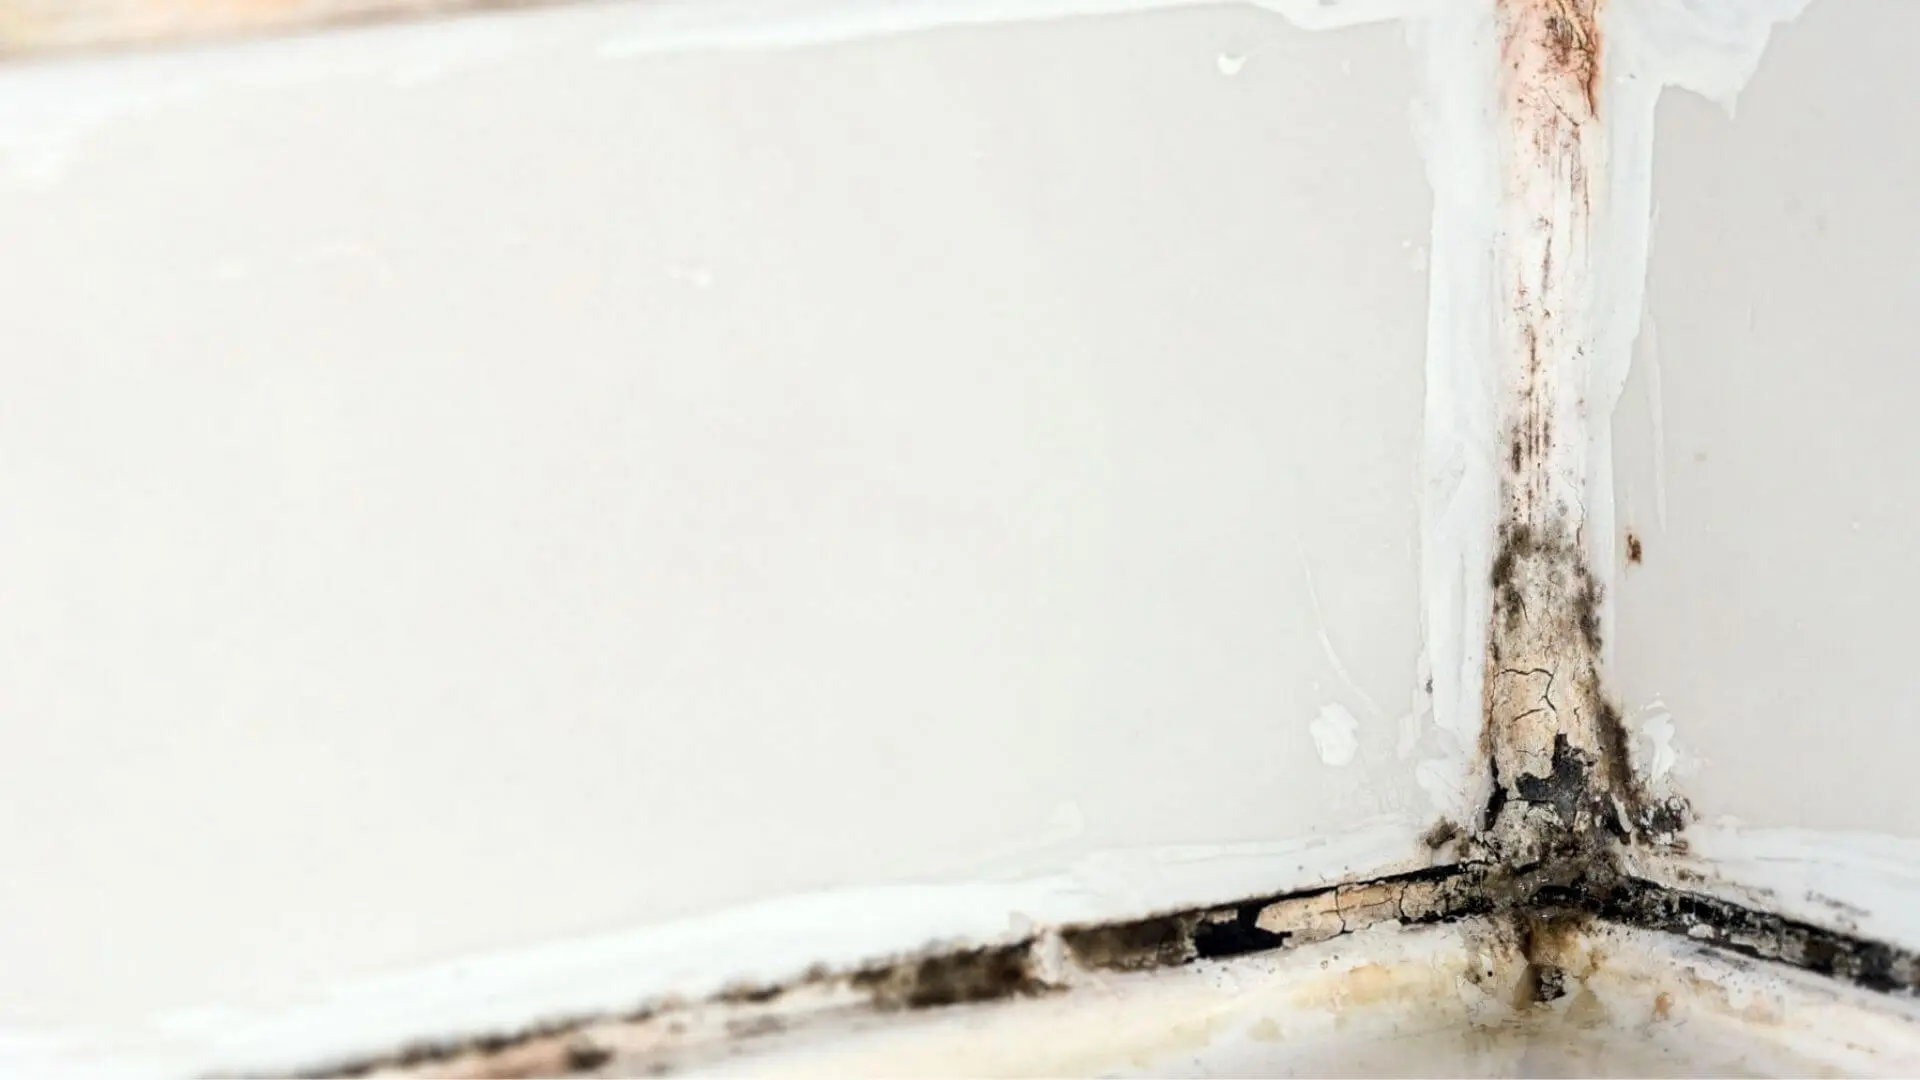
4. Mould And Mildew Spots
Fungi, mould, and mildew require only a little moisture to grow and thrive. Fungi set down their roots when a surface is damp, typically hidden in a wall, under the flooring, or in dark areas for twenty-four to forty-eight hours.
Luckily, the mould colonies have characteristic smells and distinctive colours and are relatively more straightforward to detect. However, these minor mildew and mould spots are gruesome and unhygienic.
Make it your priority to treat them on time before they decay further around your walls. A diluted bleach solution is an effective cure for it.
5. An Unexplained Odour
Trickle of water mixed with a mouldy smell can create a musty stench. Keep an eye (or nose) out for these odd smells—they’re often the best clue you’ve got that water is hiding out somewhere it shouldn’t be.
Typically, stagnated water smells odd, like rotting organic matter because of hydrogen sulphide production. It can also lead to brooding larvae and houseflies.
6. Water Meter
Monitoring the water meter is the most reliable method of detecting a leak. Although this method can be a little cumbersome, it is effective nonetheless.
First, turn off all the water outlets, faucets, and appliances. Double-check that devices like washing machines, dishwashers, and water purifiers are correctly switched off.
Then go out and check the water meter. You have a fast-leaking crack if you notice any change immediately.
If there’s no visible change, remember the usage level and check back after one or two hours, keeping the water supply off. This will help you detect a slow-moving leak.
How To Fix A Hidden Water Leak Inside A Wall
We’re done with the first half of the article. Once you master these simple techniques, you can detect hidden leakages from your bathroom leak to kitchen leak and other fixtures. Let’s discuss fixing the inaccessible pipes yourself instead of calling a plumber.
But working out a hidden leak is no child’s play as it requires some skills. Follow our step-by-step guide to get a rough idea of the process and ensure the leak is fixed properly. Do not take up the task alone if you are a newbie.
1. Cut Out The Wall Section
Once you have correctly tracked down the exact location of the leakage, proceed ahead and cut out a section in that spot. You’ll have to use a saw or a knife to open a hole in the wall.
Access the pipe carefully and make a section of reasonable size; however, avoid making it unnecessarily big. It will be easier to fix the tube, but you’ll have issues sealing the wall.
2. Detect The Crack
Sometimes, the leak is so minuscule that it isn’t visible at first glance, so search for it attentively. If you can’t see it, don’t worry. We have a simple trick to detect the leakage quickly.
Wrap a paper towel or sheet around the tube and swipe it slowly along the length. The sheet will become wet at the leaking spot.
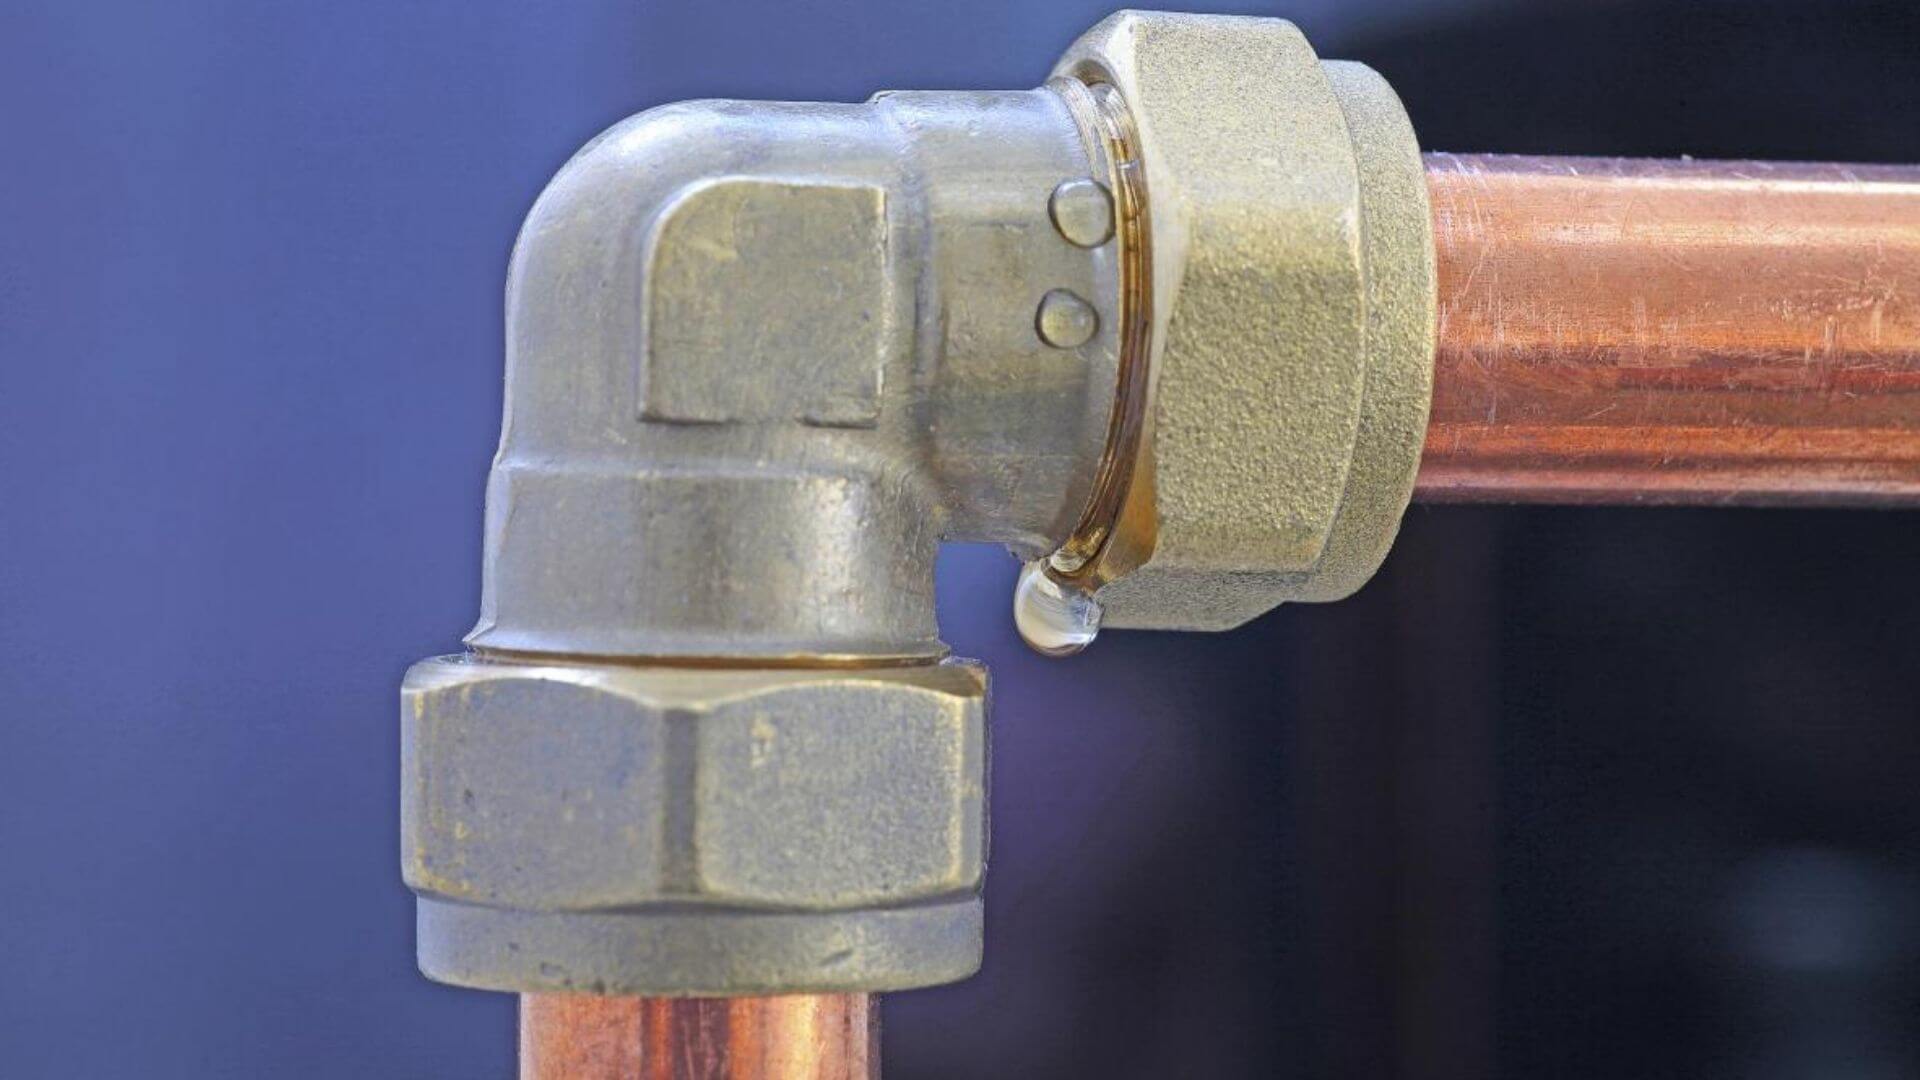
3. Chop The Pipe And Prep It
To cut the pipe conveniently, you’ll need a professional pipe cutter. Before doing that, place a container below the pipe to collect the spilling water.
Tighten the tool around the tube, right below the leaky spot, and keep rotating until you have a cleanly cut section. Also, make sure to repeat the process above the crack.
Furthermore, clean and dry the section properly, ensuring it is free from obstructions.
4. Mount A Repair Sleeve
A copper repair sleeve can’t be directly mounted on a pipe, so heat one end using a blowtorch. Let the soldered part melt down nicely and fit it with the pipe, sealing the joint.
Wait for another ten minutes, giving it sufficient time to cool, before following the same procedure for the upper end. Once done, double-check the leak; when satisfied, you can fix the wall.
You must take proper preventive measures while using the blowtorch and work cautiously. Hence, don’t forget to wear safety gloves and goggles.
5. Patch Up The Wall
With most of the work done, sealing the wall is just the finishing touch. Use leftover timber for wooden walls or a mix of brick, concrete, and plaster—whatever works best for the spot.
It seems so far-fetched, right? All this hassle for a small leakage? So, it is far better to install a durable plumbing system, to begin with, while conducting pipe checks annually to keep troubles at bay.
Detecting A Hidden Water Leak In Your Bathroom
Hidden leaking pipes can be a real headache and need quick action.
Thankfully, our guide gives you all the juicy details you need to tackle those sneaky leaks. Feeling confident yet? If you are, give yourself a pat on the back!
However, don’t worry if you are still feeling lost about it. Try going through the guide again and refer to some other articles.
But remember that it is a tedious task, and you might accidentally damage the pipe further. Hence, we’ll again recommend calling for professional help from a trained plumber as soon as you find a leakage. Your professional help can efficiently identify hidden plumbing leaks. With their eye for signs and the latest technology like CCTV drain cameras and leak detection devices, it’ll be easy to determine a musty smell, water leak, sagging ceiling, peeling paint, when water accumulates in specific areas, damaged flooring and more. And before your place becomes a perfect breeding ground for moulds and bacteria, your hidden leak can be fixed.
We hope our tips and tricks will help you in the long run, so we’ll sign off. See you next time with another handy little guide on other important topics.
Goodbye and happy plumbing!


